|
I’ve been meaning to do this for a few days, but with releasing a new book and doing new covers for the other books in the series, plus getting another book done and sent to the editor, without needing Gilder to frame for it all, I’ve been a little behind. Which is a shame really, because the guys at Zombie Tools really deserve some serious respect in my book. Back in 2013, when I was first writing Zompoc Survivor: Exodus, I asked the guys at Zombie Tools if I could mention a couple of their creations in my books. A day later, they responded and said it was cool, thus giving birth to one of Dave’s signature weapons, the Deuce II. Fast forward a few months, and one critic was doubting that Dave could have done all of the things he did to prep on a writer’s income. Challenge accepted! Thus began my quest to get everything Dave started out with. For the most part, I’ve succeeded (I don’t have a mysterious and well-funded benefactor to help me finance the land yet. I am still accepting offers, however.) But, in a year and a half, I’ve gotten almost all of his physical gear. The Deuce was the final piece of the set I needed. Eight days ago, it arrived. And let me tell you something: The folks at Zombie Tools came through like the champs they are. I bought the Scyllis and the Deuce II, and got them in a lot less time than the 7-9 weeks on the site. They also included a message for me, even though I didn’t make a big deal about who I was when I was ordering the blades. One of their tag lines is “A fist full of ‘Fuck yeah!’ ” and after holding both blades, I get that in no uncertain terms. The Scyllis, which is a beast of a knife, is just as thick in the cross section as the sword, and both of them are thicker than most blades I’ve seen. The Scyllis dwarfs my Winchester hunting knife, and if size matters, then the Scyllis wins hands down. Until you put it next to the Deuce, which kicks ass in a whole new weight class! Both blades are well balanced, both have some serious heft to them, and I would trust my life to both of them. So, I’ve posted some pics below. Most are self-explanatory, but the first picture does require some explanation. This is a pic of my version of Dave’s basic load out. Unlike Dave, I went with the Ruger 10/22 Takedown from the start. I also put a short 4X scope on it, since I’m pretty short sighted. The black bag in front of the chair is the backpack/carrying case that comes with it. Now, I don’t make it a habit of detailing all of my preparation, but it has enough room for the rifle broken down, the cleaning kit, extra magazines (I stuck with the 10 round rotary mags) and up to 500+ rounds of 22LR ammo in a paint ball tube with plenty of room to spare. The little blue disk is the carrier for some of my ear protection. The tactical vest is primarily a prop, since Dave ends up with one several times throughout the books. The pistol is my Walther CCP. It’s a good little firearm that fits my hand well. And of course, the Deuce, carried across the back the way Dave does it. My only disappointment is that I was the second person to get a Deuce based on the ZS series of books. A few weeks before I ordered mine, the folks at Zombie Tools let me know someone else had ordered one after reading one of the books. I sent that guy a set of signed hard copies of the first two books for being so cool. That piece of paper is the personal message the guys from ZT included with my invoice. If I’m ever up Montana way, I’m bringing a case of PBR to their shop. Down at the bottom, I’ve also included the YouTube video of the boys at ZT working hard to destroy a Deuce. And yes, they had to bust their ass to break that bad boy.
0 Comments
So, a week or so ago, my buddy Kyle shows up to our weekly game night with a five foot length of PVC pipe covered in duct tape and wrapped in cord. Immediately, I’m thinking “Cool staff!” Now it bears mentioning that Kyle has a secret identity where he’s a quiet and understated engineer of amazing things. So when I told him how cool his staff looked, he just smiled and nodded and then proceeded to take it apart and show me all the goodies. I had to have one. And in a few days, I did. I asked if he could do it with wood-grain tape. Turns out, he can. If they make a duct tape of it, he can use it. He calls them Survival Sticks, and they are pretty damn cool. The outer shell is 1 inch PVC pipe, but when you remove the two end caps, you can see that the inside is not only reinforced with another layer of PVC pipe, it has an inner core of PVC that runs the entire length. Now, notice hos the inner core is recessed a little bit? Yeah, that’s because this thing isn’t just a staff. It’s a blowgun. Kyle can also make attachments for a spear and a fishing gig. Plus, with the reinforced inner core and some clever use of the cord wrapped around the base, it can be used as a survival bow. Also, he has plans for a version with a somewhat deeper recess of the inner core to make room for a small survival kit. The blowgun comes with three kinds of darts. One is bamboo, very light and good for longer range shots (and don’t let the light weight fool you. I put one of these through a neoprene target and three layers of cardboard.), the second is a lightweight steel dart with a flattened tip, and the third is a heavy dart that is basically a three inch nail. The two metal darts hit hard! I used a cardboard box propped against a tree as a backstop, and ended up having to pull them out with a pair of plyers when I missed the bird target Kyle provided me with for practice. This is one of the most versatile items I’ve ever seen, and it was worth every penny I paid him for it (I can’t quote an exact price because each one varies according to how it’s made.). As you can see, it’s pretty damn accurate. I chose a conservative range, but when we first tried these things out, we were shooting across my yard with them and putting them through multiple layers of cardboard. And because of the way it’s reinforced, not only will it support a grown man’s weight, it is also heavy enough to pack quite the wallop. And whatever you have in mind, I’m pretty sure Kyle can put one together for you. Check out the pics I took of my Survival Stick.
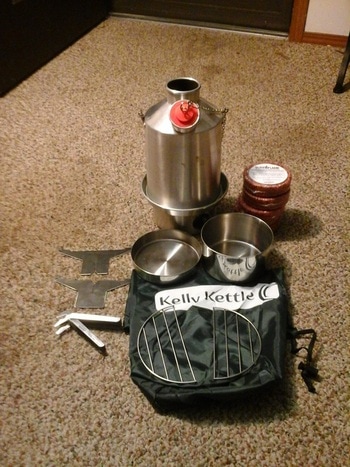
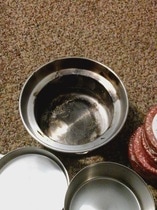
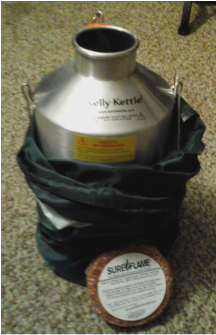
First off, an entire month went by without a blog entry. Now we see why I am a novelist, not a blogger. Second, my latest acquisition arrived today, a Kelly Kettle. I got the Scout kit, which includes the 44 oz. kettle, the large cook set (by comparison to the others, because it's pretty compact) and the pot support for the chimney. I also ordered five of the Sureflame fuel disks. Let me tell you, this thing is amazing. I didn't want to waste one of the Sureflames, so I just walked out into the yard and found a handful of twigs and some dry leaves for kindling and fuel, grabbed some lint from the lint trap on the dryer and took it out to the bar-b-que grill to try it out. To make sure I got it to light on my first attempt (okay, it took me TWO tries), I took my knife to a few of the twigs and made them into feather sticks. To be honest, my brain was fighting the idea the whole way. I felt like I was trying to make a campfire in a cereal bowl. I'm originally from Texas, and in true Texas fashion, I tend toward BIG. What most people call a bonfire, I call a cozy little blaze. If you can't see the damn thing from low orbit, you're just not trying hard enough. So breaking twigs down into four inch lengths seemed completely unnatural to me. There was no WAY a handful of dry twigs was going to get hot enough to boil water. Once the blaze was started though, and I put the kettle over it....it was like a rocket (hence the name, I suppose). I had boiling water in a matter of minutes. Now, the Kelly Kettle I got would fill the pot that I got for it pretty handily, which is great for single servings. That is what it's designed for, and it does that job well. If you have more than one person to cook for, be ready to take the time to cook for each person individually. Which, with the Kelly Kettle, won't take long at all for two to three people. More people than that, and you're going to want to use a bigger fire. Clean up...not as bad as I thought it would be. Granted, as you can see from the pictures, it's not sparkling clean, but it's a tiny little fireplace. How clean do you expect it to be? I found the hard way that using lint for tinder left an ash residue on the bottom that turned into a big lump once I poured water into the fire bowl, but it still came out easily enough. On the plus side, it still smells a little of woodsmoke, without being unpleasant to my nose. We'll see what my girlfriend thinks when she gets in. Everything packed back up in a very compact package, which is pretty cool, considering how big the box it came in was, and that everything was separate.
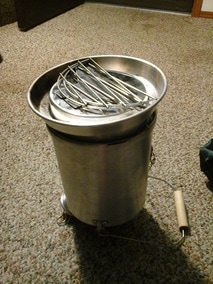
When packing it up, the kettle actually starts off upside down, like the image on the left, and the bag is fitted over it before you flip it over and get what you see on the right.
With this, you can cook for yourself and generate a lot of heat with a minimal amount of fuel, and the best part is, you don't have to carry a bunch of fuel around with you. Twigs, pine cones, anything that burns well works, and it doesn't take much. Plus, with the kettle top in place to act as a chimney, you can limit the amount of light it gives off. Perfect for those nights out in the open when you don't want to attract zombies with a big fire. So, for my next project(s), I'm going to make a Buddy Burner and a hobo stove. At least one of those makes an appearance in Zompoc Survivor: Odyssey. Until then, stay sharp and always have a plan B. In Zompoc Survivor: Exodus, Dave Stewart uses several guns. Four different pistols, three rifles and a mini-gun as near as I can remember. I’ve been interested to one degree or another with survival since the late 1980s, when I lived and worked at McConnell Air Force Base in Wichita, Kansas and my thoughts on guns as survival tools after SHTF have been very much the same the whole time. When it comes to firearms, the well-stocked survival armory doesn't need a large supply of guns, it needs a good selection of them. In a perfect world, my gun cabinet would have four, maybe five guns: two pistols (one revolver and one semiautomatic), one rifle for hunting and self-defense, one shotgun for the same purposes, and a small caliber rifle for small game hunting. 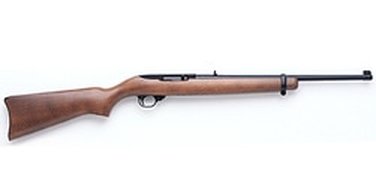 It’s the last one that I would hope saw the most use, so it’s that one I’m going to concentrate on to start with in this entry. It should come as no surprise that I chose the Ruger 10/22 as my utility rifle. Since it was introduced in 1964, over five million have been made. It’s light, handles like a dream out of the box and has negligible recoil, plus, when you can find it, .22 ammo is dirt cheap. The 10/22 is also infinitely customizable, and it’s a good gun to pick up without breaking your budget, which is the primary reason Dave has one, since I wanted his preparations to be accessible to almost anyone. To that end, Dave’s Ruger only has a couple of after-market modifications, specifically, a Tactical Solutions Magazine Release and a Simmons .22 Mag Series scope. Both of these items cost under $50, and the rifle itself can run between $200-300 depending on which one you get and who you buy it from. Extra magazines from Ruger can be ordered for about $20 each. All told, you could put together a pretty decent kit over time for under $500, with the biggest single expense being the rifle itself. Dave bought the rifle first with his tax returns, then got the extra magazines before moving on to the scope and finally the quick release for the magazines. The 10/22 is a great utility rifle. At close range, a 40 grain .22 round will drop most small game. It will also hurt most people pretty effectively if you have no other weapon for self-defense, through it’s not a man stopper. However, even from a pistol, .22 LR will penetrate through at least two standard walls (four layers of sheetrock), so you still want to be sure of your target and what is behind it if you’re shooting inside. So in a pinch, if you can only get out with one gun, the Ruger 10/22 is not a bad choice. Within 100 yards, it can penetrate pretty effectively though shot placement would be critical in a self-defense situation, and it can drop most small to medium game within about 200 yards if you need it to. It’s also light and durable, so if you have a long way to go, it won’t weigh you down so badly, especially since .22 ammo is so damn light and cheap. Also, since it's a semiauto rifle, you can put rounds downrange faster than a bolt action, and with its almost non-existent recoil, you can acquire targets pretty easily. Good for handling a group of zombies at a distance. But What about Zombies?
.22 vs zombie skull. Which one would win? That question came up from more than one beta reader. Again, shot placement is critical. In talking to Lee Close, I was quickly disabused of the notion that “headshot” equals the forehead. In fact, aiming above the eyebrows quickly became something I wanted to actively avoid. The forehead is pretty much the thickest part of the human skull, so if you’re looking for a place to bounce small caliber rounds off of, that’s the spot to aim for. But, the brain is a pretty big organ and if you really want to give a zombie a fatal dose of small caliber lead poisoning, aim for the face. Here’s why. If you put your sights on a zombie’s nose, even if you miss by even a couple of inches, you’re going to hit them either in the eye, the cheek or the mouth. While there are some pretty thick pieces of bone there, a big chunk of that area is empty space, especially the nasal cavities and eye sockets. And if you do happen to hit the nose…nothing but cartilage there. This is how Dave drops a big group of zombies with a Ruger 10/22. If a zombie does give you a profile shot, aim for the ear. It’s center mass and it’s hard to go wrong with if you’re off by an inch or three. If by some strange happenstance, the walking dead folks are facing away from you and all you have is a small caliber target and varmint rifle…don’t fix that happy circumstance by letting them know you’re there and not dead. That being said, ammo choice is also pretty important. 40 grain rounds seem to be the best combo of weight and velocity. lighter rounds are too likely to either not hit hard enough or get blown off target by wind. Too heavy, and you lose range and speed. Personally, I'd go for Velocitor rounds. So, if you have to pick one gun for your survival prep, you can't go too far wrong with the Ruger 10/22. So, it's been a while since I ate an MRE and I have a scene in Zompoc Survivor: Odyssey where they're what's for dinner. The First Strike Rations look pretty cool. I'm looking forward to trying them out myself, and comparing them to the MREs I remember (I was in when the first generation MREs were all we had).
Dave, on the other hand, made his own versions of MREs and there are lots of different versions out there to choose from. I made mention of what he made in ZS: Exodus, but I didn't go into a lot of detail then. We'll see more of what he put in his, as well as some of his other prep. Some great info on MREs and the new First Strike Rations at MREInfo. Zom appétit! |

Ben Reeder
Author of the Zompoc Survivor and The Demon's Apprentice series. Occasional wit. Constant smart ass.
Vertical Divider
Archives
January 2020
Categories
All
The Books Books By Ben Reeder: The Demon's Apprentice The Page of Swords Vision Quest Charm School In Absentia The Verge Walker:Book 1 Zombies by Ben Reeder: Zompoc Survivor: Exodus Zompoc Survivor : Inferno Zompoc Survivor: Odyssey Ash Fall The Gathering Horde |
 RSS Feed
